
3:55 MINUTES · UPDATED APRIL 2026
QuikAuthor 110: Learner Management, Share and Track Training
Assign courses to learners and track their progress with granular analytics.
About this Tutorial
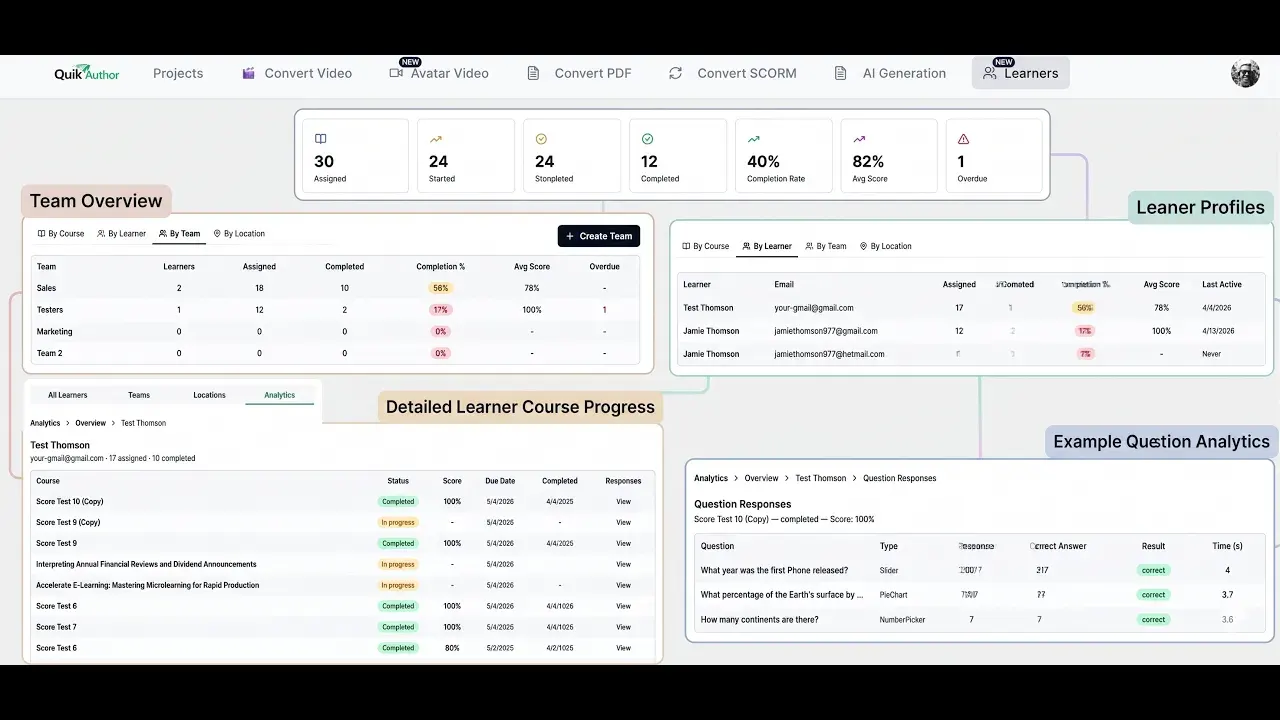
QuikAuthor's learner management tools let you add learners manually or via CSV, assign courses to individuals, teams, or locations, and send automated reminder emails. This tutorial covers the full assignment workflow, email customisation, and the analytics dashboard, from high-level completion stats down to individual question responses.
Next tutorial: QuikAuthor 111: Avatar Video, Creating Animated Courses in Minutes
Transcript
Okay, today we're going to have a look at learner assignment. As you can see here we've got a pretty clean account, we've just got one course created. So the first thing we're going to do is we're going to go up to the Learners tab. Here we have the option to import via CSV, so you can just put in all the details you want. Pro users get team and location as additional fields, and teams users get custom fields. But you have two options: either import your CSV or you can just add them manually. So we're going to call this 'Test Test2' and we're going to call it 'test2@test2.com'. And we've got some teams set up, but if we wanted to add another team, we can go ahead and do that. And again we've got a location set up, so we'll make this 'France'. Then we can just add to France. Once we've created our learner, we can see our learner appear here. You have two options now: you can assign a course direct from here. So you can do any searches you want or you can organise alphabetically or by last edited. We've only got one course here so we're going to click that. You can assign by team or location or individual. So we're just going to do an individual in this case. Next up we compose our message. We can set a relative due date, this is from assignment, or we can turn that off. We can set automated reminders after a week, on the due date, overdue, or again we can turn those off. If we scroll down we can see the pre-created subject and email that we've got here with some fields included in it. If you want to write over the top of this and make a custom email, of course you can, and then all you need to do is just save that as a template and you'll see that appear in the dropdown. You can do the same thing for the latter emails as well, so these are all your reminders. Once you're happy with that, just click Send Assignments and that will send the assignment for you. Next up we're going to have a look at analytics. But before we do that, just to say the other way that you can assign courses is if you just go to the course itself, click on share, and assign to learners. Next up, analytics. Okay, so here we are in analytics. Obviously this account's got a bit more information in it. You'll find the analytics in the analytics tab. You can do your analytics by course if you want to, so you can jump into a specific course. You can do it by learner, by team, or location. Any one of those you can drill into and get more information relating to courses. We're just going to take a look at an individual now. Let's go back to the analytics area and let's click on a learner. We're going to go to this top one here. Here we can see the details of that learner. We can see all the courses that they've been assigned and what they've been completing. And if we go into a particular course you'll see that there's a view button. Here you can see specifically how they've performed. You can see which questions they've answered, how they've answered them, whether they got that correct or incorrect, and indeed how long they took. The analytics are pretty granular. They'll give you team reporting, location reporting, individual reporting, and take you all the way down to question results.